Draw a Freehand Circle in Powerpoint
Section 9.1. Drawing on Slides
ix.one. Drawing on SlidesThe Internet'southward filled with photos and fine art you can use in presentations but sometimes y'all need a picture show that's so specific you lot demand to sketch it yourself. Imagine you're a defence force chaser edifice a PowerPoint slideshow to present at trial, and you want to draw the route your client took from his desk to the bank vault. You lot can use stock images of desks, customers, and the bank vault, but you lot need to depict your own arrows to show your client's road.
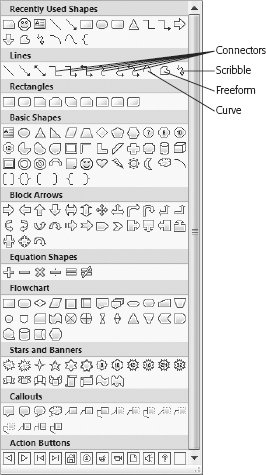
Or say you're giving a presentation to management that explains why your section is over upkeep. You've created a chart (which you learned how to practice in Chapter 6) that clearly shows the problem, but your audition (management, recollect), needs things spelled out more clearly. You tin can use PowerPoint's drawing tools to place a large red circumvolve effectually the negative total. And, right where the chart shows your section's performance taking a nosedive in October, draw a cartoon balloon with the words "Plant #2 burned down 10/xv." If yous're artistically challenged, don't worry. At that place's very little you have to describe freehand in PowerPoint (although you can if y'all want to). PowerPoint 2007 gives you special tools for drawing lines, curves, and some lxxx-odd standard shapes including banners, stars, flowchart symbols, and arrows (Figure ix-i). You can also add together congenital-in visual effectslike gradients, shadows, and reflectionsto your drawings, and connect shapes with special lines called connectors that adjust themselves automatically when you reposition the shapes they're connected to. Note: The kinds of things you lot can describe haven't changed in PowerPoint 2007, merely the way you draw them has. The shape gallery in PowerPoint 2007 replaces the AutoShapes toolbar that appeared in PowerPoint 2003 and before versions of the program. nine.1.ane. Drawing Lines and ShapesDrawing in PowerPoint ways choosing what you want to depict from a gallery of lines and shapes and then dragging them over your slide.
nine.1.ii. Cartoon ConnectorsConnectors are special lines you depict betwixt two shapes to connect them. The cool matter near connectors is that when y'all reposition one (or both) of the shapes, PowerPoint automatically adjusts the connecting line. Connectors are great for drawings similar flow charts , where you ofttimes need to add and reposition shapes as you piece of work. To draw a connector:
| ||||||
|

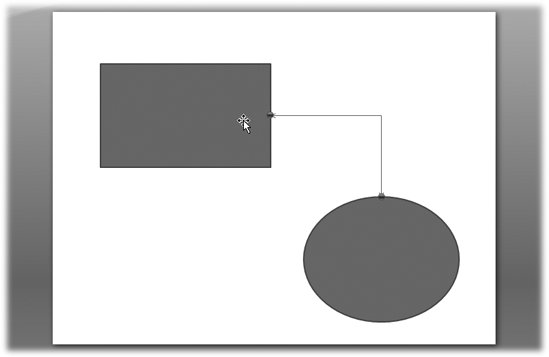
Click one of the blood-red connection squares on the get-go shape and drag toward the second shape.
PowerPoint displays red connection squares around the edge of your second shape.
When your cursor's over one of the red connection squares at the edge of your second shape, permit go of the mouse button.
One red connector dot appears on each shape (Figure nine-4) to testify where yous've connected them.
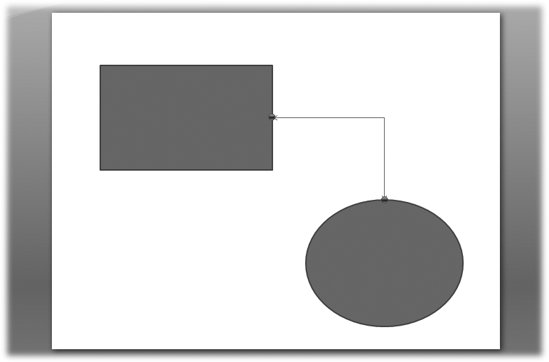 | Figure ix-four. You know yous've successfully continued two shapes when you encounter 2 red circles, i at each end of the connector. When y'all reposition a connected shape, PowerPoint automatically adjusts the connector so the connexion doesn't break. |
You tin tell PowerPoint to redraw , or reroute , an existing connector so information technology looks ameliorate. (Sometimes dragging the connected shapes effectually leaves the connector looking cramped or oddly bent.) To reroute a connector, select it and so, from the Cartoon Tools Format tab, choose Edit Shape  Reroute Connectors.
If you're still not happy with the way PowerPoint reroutes your connector, you tin practice it yourself. To move the connection from, say, the top of a shape to the bottom of the shape, click the connector and move it until the end of the connector snaps to the crimson connector square at the bottom of the shape.
9.1.three. Drawing Freehand
Drawing lines, curves, and predefined shapes is fine, simply a bit limiting. PowerPoint too lets you draw freehand, like y'all'd draw on a piece of paper. While drawing freehand doesn't usually yield geometrically precise results, depending on the event yous're trying to achieve, it tin be quickerand much more satisfying .
You draw freehand in PowerPoint using i of two options: Scribble (PowerPoint'due south virtual pencil) or Freeform (like Scribble, simply with the added ability to draw perfectly direct lines and corners).
9.1.three.1. Cartoon freehand using the Scribble tool
The Scribble tool is the closest affair to a pencil you'll detect on a computer. When you plough it on (Figure 9-5), you lot can elevate your mouse around, and PowerPoint shows your exact movements on the screen.
 | Figure 9-5. Don't exist alarmed if, when you're drawing with the Scribble tool, the nice round curves yous're trying to draw await herky-hasty. PowerPoint smoothes them out after you finish drawing. |
Tip: Since it's hard to draw with a mouse, y'all'll take more success if you lot hook upward a graphics tablet (from about $50 up) to your computer. That way, y'all can draw with a stylus exactly like cartoon with a pencil.
Click Insert Illustrations Shapes. On the shape gallery, caput to the Lines section and click the Scribble option (Effigy nine-v). When yous move the mouse over your slide, the arrow cursor turns into a miniature pencil. Elevate it to draw on your slide; double-click to finish drawing. Figure 9-half dozen shows you a typical result.
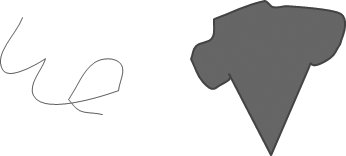 | Effigy 9-6. With both the Freeform and Scribble tools, you click your slide and drag to draw. But when y'all use Freeform, clicking multiple points tells PowerPoint to draw straight lines in betwixt the pointsa boon for folks who find cartoon straight lines hard. |
9.1.3.2. Drawing freehand with the Freeform tool
The Freeform tool gives you the best of both worlds . You tin can drag freely as with the Scribble tool, only also add perfectly straight lines and corners when you lot need to.
Click Insert Illustrations Shapes. On the shape gallery, click the Freeform option, and and so mouse over your slide. The cursor changes from an arrow into a + sign. To draw on your slide, press the mouse button every bit you elevate to create freehand lines and shapes. Click 2 points (without belongings in betwixt) to create a direct line. You can see an example of a shape created with freeform in Figure 9-6.
To return your cursor to normal, printing Esc.
| GEM IN THE ROUGH Tips for Faster Drawing |
| Using a computer program to depict anything more complicated than a quick callout or arrow tin exist tedious , no affair which program you're usingand PowerPoint is no exception. PowerPoint includes some shortcuts for faster, easier cartoon, just it doesn't make them obvious. So here they are, in no particular guild:
|
![]()
mcclearyroonstank.blogspot.com
Source: https://flylib.com/books/en/4.20.1.63/1/
0 Response to "Draw a Freehand Circle in Powerpoint"
Post a Comment